
Continuation of the post Hardware and Software (I)
Odroid M2
The Odroid M2 deserves a dedicated article, as installing and configuring the operating system requires a few extra steps and a fair amount of patience.
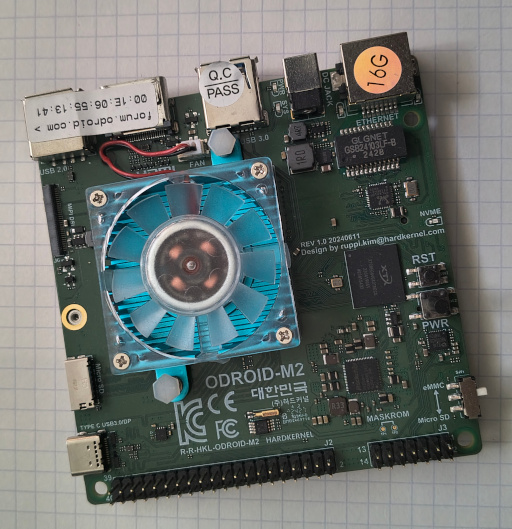
The board vendor seems particularly fond of shipping museum-grade software as officially supported images. Personally, I am not a fan of running Ubuntu 20.04 with a 4.9 or 5.1 kernel in 2026. That is not exactly what modern workloads are looking for.
Instead, I strongly recommend using Armbian, whose developers release updates regularly. If you’re impatient, you can always build your own image.
Unfortunately, after installing the official image on an SD card, it quickly becomes apparent that Kubernetes is not particularly happy with the default kernel configuration. The kernel is built with only a minimal set of features enabled, so it is time to roll up your sleeves and build a custom version.
Storage
The Odroid M2 provides an M.2 NVMe slot on the underside of the board, making SSD installation straightforward. Simply insert the drive, secure it using the supplied screw, and enjoy your new storage.
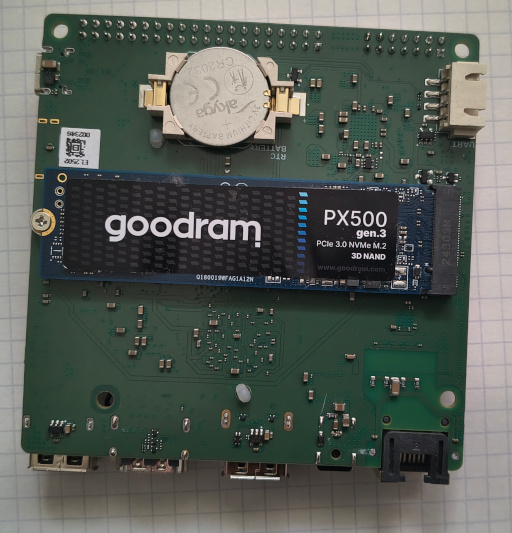
Important: The board cannot boot directly from an NVMe SSD. You must use either an SD card or the built-in eMMC module for booting.
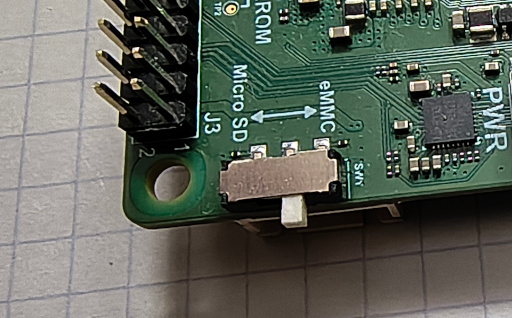
Take a close look at the connectors and switches on the board. One of them controls the SD/eMMC boot source selection. During installation and initial setup, leave it in the Micro SD position.
Building the System
Additional requirements: two SD cards (assuming limited prior experience and the possibility of rebuilding the image later).
Bootstrap
Start by installing the latest version of Armbian onto an SD card and booting from it.
Next:
- Complete the initial system configuration (passwords, user accounts, locale, and everything else the setup wizard asks for).
- Allow your user to execute
sudowithout a password by adding something similar to/etc/sudoers:
marcin ALL=(ALL) NOPASSWD:ALL
- Install
git. - Clone the build repository:
git clone --depth 1 https://github.com/armbian/build
- Launch the main build script:
cd build
./compile.sh
The script handles the entire build process:
- installs missing dependencies,
- guides the user through the required configuration,
- downloads and builds the kernel,
- fetches all remaining packages,
- generates a complete system image.
Configuration and Build
Important options in the configuration wizard:
Show a kernel configuration menu before compilation
The default kernel configuration is generally reasonable, but it is worth verifying that options required by Kubernetes are enabled, particularly various netfilter features.
Choose a board→ odroidm2Choose a kernel→ currentChoose a release package base→ noble
(resolute has recently appeared, but I have not tested it yet.)
Choose image type→ Image with console interfaceChoose image type (II)→ Standard image with console interface
You may spend anywhere from a few minutes to several hours reviewing kernel options, which is why I recommend having a spare SD card available.
Once configuration is complete, the build system will spend quite some time compiling kernels, building packages, and assembling the final image.
During that time, you can:
- go for a run,
- visit the swimming pool,
- ride a bicycle,
- or, as a last resort, take a very long walk.
Once the build completes successfully, you should find something similar to the following in output/images:
Armbian-unofficial_26.08.0-trunk_Odroidm2_resolute_current_6.18.35.img
Yes, every locally built image automatically receives the -unofficial suffix.
Writing the Image
Since the device only provides a single SD card slot, you will need to transfer the generated image to your regular workstation and write it to the second SD card.
After that:
- shut down the device,
- replace the SD card,
- power it on,
- enjoy your shiny new system,
- go through the initial configuration one more time.
Make sure the SSD is visible:
lsblk | grep nvme0
The output should look similar to:
nvme0n1
Installing the System onto eMMC and NVMe
Running from an SD card is useful for diagnostics and experimentation, but the built-in eMMC should be used for everyday operation.
To begin installation:
armbian-install
The most important choice during installation is:
boot from eMMC, root from NVMe
The installer will warn about potential data loss, create fresh partitions on both eMMC and SSD storage, and transfer the already configured system onto the SSD.
As a result, you will not need to repeat the entire setup process again.
Once installation completes:
- shut down the device,
- remove the SD card,
- switch the boot selector to
eMMC, - power the board on,
- enjoy a significantly faster-booting
Odroid M2.
Final System Configuration
The first thing to do is disable swap.
Check whether swap is active:
swapon --show
free -h
Typical output:
NAME      TYPE SIZE USED PRIO
/swap.img file   8G   0B   -2
Disable it completely:
sudo swapoff -a
If swapon --show reports something like:
/dev/zram0
then zram should be disabled as well:
sudo systemctl disable --now armbian-zram-config
Optionally remove the configuration:
sudo rm -f /etc/default/armbian-zram-config
Kubernetes does not particularly appreciate active swap devices, so it is best to disable them before proceeding further.
Your user account probably no longer has passwordless sudo access, so repeat the same sudoers modification as before.
Finally, replace your SSH keys:
ssh-copy-id marcin@odroidm2
In my case:
ssh-copy-id marcin@10.10.10.24
Voilà. The system is now ready for the next stage.